
How hard is it to flock a Christmas tree? Is this a project I can do myself? Well, let me tell you about the time I decided to flock my own Christmas tree and then you can decide for yourself. I’ll also update on what your tree will be like after you flock it. How long will the flock last? Will I have to flock my tree again next year? Let’s walk through how to flock a Christmas tree together.
Why Flock A Christmas Tree?
I have loved the look of a flocked tree for many years. However, I have two very large green trees and no where to store another large tree. I felt like I would have to retire or get rid of one of my green trees to add a flocked tree. Really, the only solution I could see was to flock one of the trees I already had. So, I researched it for quite a few years, actually. I watched all the YouTube videos I could find and read all the Pinterest posts that were out there.

Finally, I pulled the trigger on this project about three years ago. I got my flocked tree without having to buy a new tree, find a place to store another tree or get rid of one of the trees I already had. So, why would you flock your Christmas tree? I would say to refresh or spruce up an old tree.

Is Flocking a Christmas Tree an Easy DIY?
Is this a project you can do yourself? Yes. Absolutely, and I am going to give you some tips to make it easier. Let me share what I have learned about flocking over the last three years.
1. Flock Indoors
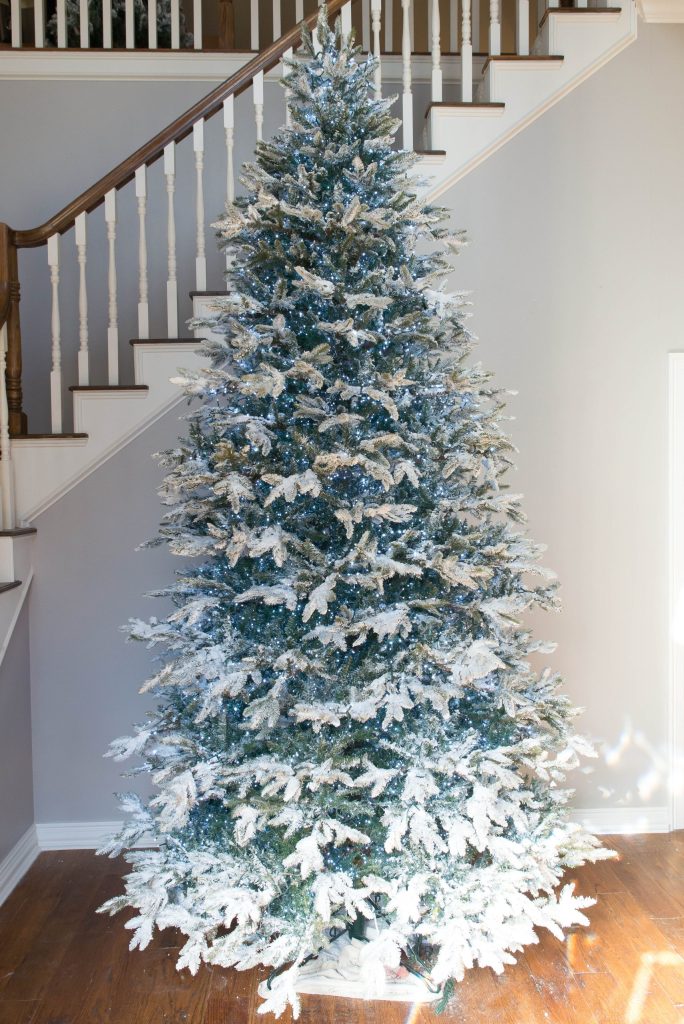
This might be a controversial tip because I see people saying to do this project outdoors. Maybe if you have an enclosed place like a garage, that would work, but then you will have to move your tree inside. You are going to loose a lot of that hard work you just put into flocking that tree when you move it. I have always flocked my 10 foot tree in the foyer where it stays for Christmas. It is such a large tree that moving it would require taking it apart and folding it up to get it through doors. It wouldn’t be worth it to move this large tree, so I just do it where it stands.
I did add flock to a smaller 6.5 foot tree this year as well. I flocked it in the same space, my foyer. Then I picked it up without folding it and moved it to my living room. This was much easier, but again I didn’t fold it.
If you have the space, I definitely recommend flocking your tree indoors. First of all, you don’t have to worry about weather or wind and you don’t have to move it indoors when you are done.
2. Cover Your Floors
If I have convinced you to flock indoors, then I need to tell you to cover your floors before you begin. You are basically going to be working with glue. You don’t want that on your floor. The first year I flocked, I covered the floor around the tree with kraft paper. That was not the best solution. Once the glue gets on the paper, it sticks to your shoes and then you end up pulling the paper up. Cardboard worked better. I ended up placing boxes around the tree and they didn’t come up like the paper did.
This year, I used a drop cloth and that worked great. This was probably the best floor covering. The only difference was that when I was done flocking, I couldn’t just throw it away. I had to toss it in the washing machine. So, just be sure to cover your floors around the base of the tree.
3. SKIP THE SIFTER
THIS IS MY BIGGEST TIP! DON’T USE A SIFTER! When you buy your flock, there are going to be instructions telling you to use a sifter to apply your flock. DON’T DO IT!
The first year I flocked, of course, I followed the instructions and used the sifter indoors. What a huge dusty mess! Most of the flock ended up in the air, not on my tree. Can you imagine doing this outdoors in the wind? Counter productive, I’d say. The sifter is just not necessary and really just creates dust. Skip it all together. I’ll tell you my best method below.

4. Flock The Whole Tree At Once
The first year I flocked, I put one section of the tree at a time in the tree stand and flocked each section separately. I over analyzed the situation, trying to ensure I had even coverage on all the sections. This is a waste of time and space. Just put your tree together and flock it! Don’t over analyze it. Just do it!

How Long Does Flock Last? Will I Ever Have To Flock Again?
Your flock is going to look great for one year. When you take your decor and lights off your tree, fold it up, and dump it in the attic, you are loosing a lot of flock. You are also doing damage to the flock that is left. It’s not going to be pretty the next year. Just plan on giving your tree a refresh of flock every year. Each year the flock will build on itself and you’ll have a more snowy look each year. Also, the flocking gets easier and easier every time you do it. Don’t let this scare you off from flocking a tree. Just know that once you flock, you can’t stop!
I did have someone tell me that they wrapped their DIY flocked Christmas tree with saran wrap, stored it upright in a basement and the flock looked great the next year. I can see that working, but I don’t have that luxury in my house. There is nowhere for me to store my 10′ tree upright.
How To Flock A Christmas Tree Step By Step
Step 1: Spray Tree Branch With Water
Once your tree is put together, your floors are covered, and you’re ready to start flocking, the very first step is to wet your branches. A spray bottle is recommended. I had two which was handy because I would fill both up at the same time. Don’t be shy with your water. That is what activates the flock and makes it stick together and to the tree. Wet a small area of the tree pretty well. You don’t want it to dripping, but close. I like to wet about two or three branches at a time.
Step 2: Apply Flock
Next, you will place your flock on the wet branches. I like to use a large plastic tray to hold my flock, like a zip lock tray or large container. I hold the tray of flock below the branch I am working on and use my hand to dump a bunch of flock on top of the branch. I also like to be sure that I have sprayed the underside of the branch in step one so I can dip my branch in the tray of flock as well. This really helps get that fully flocked look.
The first year I flocked with the sifter I realized all of the flock was on the top of the branch and since this tree was so so tall, I was mostly looking at the underside of the branches with no flock. So, the next two years I was sure to dip m branches. It’s so much better.
Also, by holding the tray under the branch when you are putting the flock on lets you catch the excess in the tray. You are going to get so much more flock on your tree and in your tray this way verses the sifter method.
PRO TIP: START AT THE BOTTOM
You want your flock to fall on wet branches. So, if you start at the bottom, those branches will be wet and the flock you put on above them, might stick to the branches below if it falls. I always start at the bottom.
PRO TIP: FLOCK THE TIP OF THE BRANCHES
My trees have molded plastic tips and that’s where the flock sticks the best. The back branches are shredded PVC and the flock does not look great on that part of the tree. The first year I flocked with the sifter and did each section individually so that I could get the flock all the way into the tree. Don’t do that. It just flakes off and doesn’t stick very well. Just concentrate your flocking efforts on the plastic tips. If your tree is just shredded PVC, I wouldn’t flock it.
Step 3: Spray With Water
After you have flock on your branches, spray it again with water. Don’t be shy here either. You have to get it wet. If you have a bunch of flock pooled up on a branch, spray it until it is wet all the way through. This is the step that activates the flock. If its not wet, it won’t stick and it will fall off. We want to keep that flock on the tree!

Step 4: Repeat
This process builds on itself. The flock will stick to flock, so keep it up. Spray, flock, spray. Obviously it depends on the look you are going for, but if you are going to the trouble to flock your tree, I assume you want it to look flocked. The first year is hard to build up the flock, but each year gets easier and easier.

Step 5: Let Dry
You will want to leave your tree alone at least over night to give the flock time to dry and harden. If you have squishy areas, it’s not dry. Let it dry, then add lights and decorate.
You could even add one more spray of water the next day over the whole tree just to make sure you got all the flock locked in. This won’t take overnight to dry, maybe a couple of hours.
How Much Flock Do I Need?
When flocking or taking on any DIY really, ask yourself whether you would rather run out of supplies during your project or have left over supplies at the end. Always choose leftovers! The first year I flocked this 10′ tree, I started with a five pound box and thought that would be plenty. Well, you read the part about this tree being 10 foot, right? I ended up needing more and had to order again. I ended up putting 9 pounds of flock on this tree.
The next two years I flocked the same tree, I would estimate I used about 5-7 pounds of flock. It’s got a really good base of flock built up on it now, so I expect I will use less and less.
Can You Flock Anything?
Before I flocked anything, I would test it. Before I flocked my whole 10′ tree, I practiced on my little table top miniature trees. I certainly didn’t want to ruin a 10′ tree. I did learn in the process of flocking my 10′ tree that the flock doesn’t look great on the shredded PVC. So, I wouldn’t flock anything that is just shredded PVC. I do think you could flock other things like garland or wreaths, but I would make sure your flock is going to stick first.
I re-flocked a factory flocked Christmas tree this year and that went well. I bought the tree with flock, but over the years of decorating and undecorating, it had lost a lot of its flock. I added my own and the flock stuck really well to those pre-flocked branches.
Is It Worth It To Flock My Christmas Tree?
Was it worth the time, effort, and money spent on flock? I would say yes. The tree really is pretty in person and a new flocked tree of this size would have cost a ton more than the flock. I really wanted to lighten up that tree and I think I have done it. It has a whole new life!

My name is Tara and I blog here about my home, my life, Christmas and all things in between. Thank you for stopping by MomCanDoAnything.com! Over the last seven years, I’ve documented my passion for home improvement projects and DIYs, sharing valuable insights and inspiration for transforming living spaces.
My true love lies in seasonal decor, especially Christmas, and I delve deep into tips and tricks to make your festivities truly magical. Don’t miss out on the chance to explore my brand new retail site at ww.HolidayHangups.com and my Etsy site, Holiday Hangups, where you’ll find an exquisite collection of Christmas decor to adorn your home.
Beyond that, my blog also features an array of lifestyle posts, covering school projects, delightful recipes, heartwarming family conversations, captivating photography, and unforgettable travel experiences. I invite you to dive into my other articles and discover the joy of creating a cozy and enchanting life. Happy reading and don’t forget to spread the cheer!
Check out some of my other Christmas trees below.
How To Take Your Christmas Tree Up A Notch
Green and Gold Christmas Decor
Pin How To Flock A Christmas Tree Here

Shop How To Flock A Christmas Tree Here


Leave a Reply