
I recently completed a bathroom redo that has been a long time coming. Keep reading to see how to paint cabinets with chalk paint and how to add a little fun to your bathroom.
BEFORE
When we bought our house about seven years ago, the existing bathroom had been recently remodeled with a new shower and granite counter top. It wasn’t completely offensive, but as I lived with it for years and years, I began to hate the wallpaper. It had some french words on it that you could barely read and it really started to drive me crazy. Here is the picture that is still on Zillow.

This post contains affiliate links and if you purchase a product I may make a small commission. This is at no additional cost to you. Thank you for supporting Mom Can Do Anything.
It’s pretty golden and the ceiling had popcorn on it, like all of our ceilings. So, when I had my handy painter working on the guest room around the corner, I had him remove the wallpaper and scrape and paint the ceiling white. I didn’t know what I wanted on the walls, so I just had him leave them bare. Then of course, I analyzed and test painted and over thought the whole thing for about a year. Here is what it looked like for that year and honestly it bothered me less than it did before.


THE WALLS
After all that time of thinking about what I was going to do, I ended up grabbing a can of paint I already had in the garage and painting the walls. It was Alpaca by Sherwin Williams, a very soft gray that I also used upstairs in my playroom area. As you can see, the walls had never been painted before, and I had painted some pretty dark colors on the wall during my paint testing process. So, I did use a little primer before I painted, but I didn’t prime the whole bathroom.
Also, I took down the long towel rack on the wall and the little one by the sink, and then I filled those holes in with putty and sanded them down. I ended up just doing one coat of paint, and I thought it looked great. Maybe my painter would tell me I should have gone for two coats, but I think it’s fine.
HOW TO PAINT CABINETS WITH CHALK PAINT
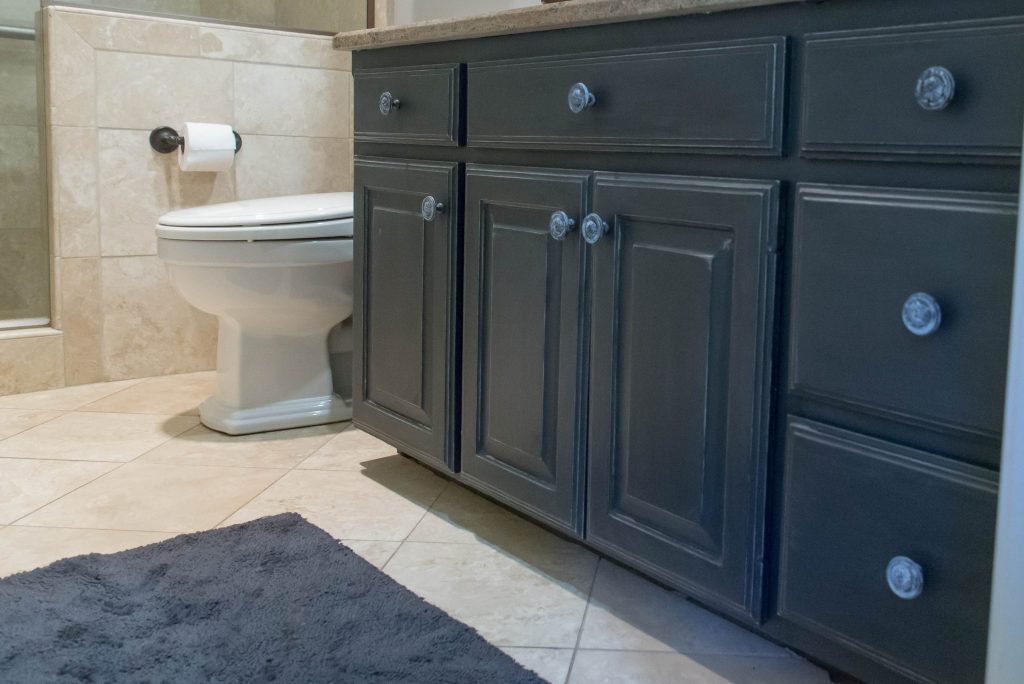
As you can see in the pictures above, my cabinets were white. The granite is somewhat brownish with dark gray specks. Since I went with such a light colored wall, I decided to do a really dark cabinet. I loved it. I think it really grounds the vanity area and makes it more of a feature. It compliments the granite and adds great contrast to the tile.
Here is how I did the cabinets.
STEP ONE: DETERMINE WHAT TYPE OF PAINT YOU WILL BE PAINTING OVER
I first determined that the existing paint was water based paint; therefore, I could use chalk paint on the cabinets. I did paint the inside of a door first just to be sure because I have heard terrible stories about paint peeling off. So, I wanted to be sure.
STEP TWO: A LIGHT SANDING
Before I painted the rest, I sanded down the shine on the outside of the cabinets with a little sandpaper. Not a major sanding, just enough to get rid of the shine.
STEP THREE: PAINT TWO COATS OF CHALK PAINT
I had never worked with chalk paint before and it is a little different than painting with latex paint. It does not feel as smooth when you are applying it with your brush. I guess that is the chalk texture. Your brush just doesn’t slide as easily. It’s not difficult, just a different sensation. I painted two coats on the cabinets.
STEP FOUR: DISTRESSING
I was thinking I’d all a little farmhouse feel, so I decided to distress the cabinets. I would used that sandpaper to take off a little paint around the edges to give it that distressed look you always see with chalk paint.
STEP FIVE: DUST
Once I thought they looked good, I wiped them down to remove all the dust I created with the distressing.
STEP SIX: ADD YOUR TOPCOAT OF SEALER
I used Rutoleum chalk paint in charcoal and the flat sealer so I didn’t loose that chalky look. I did two coats of sealer with a little help from my daughter on this one.


LIGHTING UPDATE
I took down the sconces that I hated and replaced them with some outdoor sconces from Home Depot that had a little more farmhouse style. This really wasn’t all that difficult, but I did learn what not to do on the first one.


MIRROR UPDATE
I painted the mirror with the same chalk paint I used on the cabinets and then added a light layer of Rub-N-Buff in antique white with a rough paint brush.


CABINET HARDWARE UPDATE
I used the same Rub-N-Buff on the knobs. I just used my finger to lightly apply it.

SHELVES
I hung ledge shelves I found at Target and added some towels I also found at Target that I thought tied all the colors together. The color of the shelves also tied in with the color of the tile.

FUN
Finally, I added a little fun to this bathroom with targets and a rubber band gun. Yep, that’s right – a rubber band gun. The kids and I painted some targets on a few burlap canvases I had sitting in my office waiting for inspiration to strike. We also added a large bowl of rubber bands so you never run out of ammo. I did paint a large canvas with chalk paint and draw targets on it and it is hanging on the wall, but I have a great idea for a printable target that I will post soon. The gun and rubber bands you can find at www.elasticprecision.com.


HOW TO MAKE TARGETS FOR YOUR RUBBER BAND GUNS
On the targets we just drew circles and painted.

FINAL REVEAL
Here it is. I love it now. I think it is so fun and I love the rubber band gun.


Rub’n Buff comes in several different colors. I used antique white. You can get some colors at Michaels or Hobby Lobby, but I found all the colors, including antique white, at MisterArt.com.


Pin Bathroom Ideas: Chalk Paint & Fun here!


[…] Speaking of chalk paint, here’s another place you can use it – on bathroom cabinets. I painted the cabinets in my guest bathroom with the same Rustoleum chalk paint that I used in the master bedroom. This paint adhered to the cabinets and is holding up very well. If you want to see the details of this DIY, you can check out Bathroom Ideas: Chalk Paint & Fun. […]